In order to create high-quality 3D character models, you need the right tools and some basic knowledge of how to use them. In this article, we’ll walk you through the steps necessary to create a character from scratch, starting with the basics of modeling and finishing up with tips for exporting your model for use in games or other applications. Let’s get started!
click here – Why Math is hard for some students?
1. What you need to get started
In order to create a 3D character model, you will need:
– A 3D modeling program. There are many different programs available, but for this tutorial we will be using Blender, which is free and open-source.
– A reference image or two. It can be helpful to have one or more images of the character you want to create, so that you can use them as a reference while you work.
– Basic knowledge of how to use your chosen 3D modeling program. If you’re new to Blender, there are plenty of tutorials available online to help you get started.
Blender is a powerful 3D graphics tool that is well suited for 3D character modeling. The software has a wide range of features that allow users to create highly detailed models, including support for sculpting, rigging, and animation. In addition, Blender is free and open source, making it an affordable option for independent artists and developers. While Blender does have a steep learning curve, the investment of time can pay off in the form of high-quality character models. For those looking to get started in 3D character modeling, Blender is an excellent choice.
2. Modeling the head
In the world of 3D character modeling, the head is often considered one of the most challenging parts of the body to model. This is because the head is relatively small and contains a lot of intricate details, such as the eyes, nose, and mouth. Furthermore, the head is also typically the focal point of a character, which means that it needs to be modeled with a high level of detail.
So, the first step in creating your character is to model the head. Start by creating a basic mesh, using either primitives or the sculpting tools in your 3D modeling program. If you’re using Blender, we recommend starting with a cube and then adding subdivisions to create more detail.
Next, begin shaping the head to match your reference image. Add eye sockets, a nose, and a mouth, paying attention to the proportions of the face. Once you’re happy with the overall shape of the head, it’s time to add details such as hair, pores, and wrinkles.
click here – Guidelines to Be Followed to Appeal Academic Dismissal or Suspension
3. Modeling the body
After you’ve completed the head, you can move on to modeling the body. As with the head, start with a basic mesh and then add detail to match your reference image. Remember to add subdivision levels so that the body has enough detail when viewed up close.
However, if to describe with a bit more detail in order to ensure the quality of your 3D character, you need to accept that the human body can be both the most challenging and the most rewarding subject matter. To create a convincing and realistic model, it is important to understand the anatomy of the human body and how it moves. Here are a few tips and tricks for modeling the human body in 3D:
- Start with a basic mesh. The human body is made up of many different shapes and forms, so it can be helpful to start with a basic mesh that you can then adjust and add details to.
- Pay attention to proportions. Getting the proportions of the human body right is essential for creating a realistic model. Use reference images to help you get the proportions correct.
- Model each part of the body separately. The human body is made up of many different parts, so it can be helpful to model each part separately before putting them all together. This way, you can make sure that each part looks right before moving on to the next one.
- Add details last. Once you have the basic shape of the human body modeled, you can then start adding in smaller details like wrinkles, pores, and fingernails. It is often best to save these details for last, as they can be easily added or removed depending on what looks best.
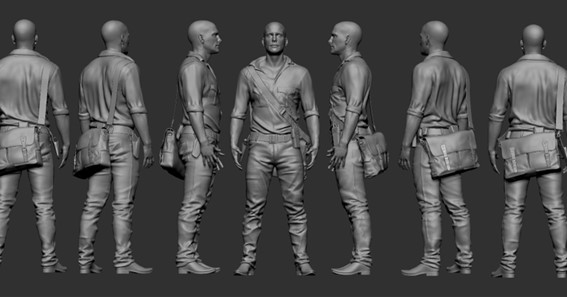
4. Adding clothes and props
Once you’ve modeled the head and body, it’s time to add clothes and any other props your character may need. Again, use your reference image as a guide while you model each piece of clothing or accessory.
Overall, adding clothes and props to 3D character models can be a challenge, but there are a few tips and tricks that can make the process easier. One way to add clothes is to use texture maps. These are images that can be draped over the character’s mesh to create the appearance of clothing. Another way to add clothes is to use separate meshes for each garment. This can be more time-consuming, but it gives you more control over the shape and fit of the clothing. When it comes to adding props, it’s important to make sure that they are properly scaled. Otherwise, they will look out of place and disrupt the illusion of your 3D world. Finally, remember that less is often more. A few well-chosen props will add realism to your scene, while too many props will make it look cluttered and unrealistic. With these tips in mind, you’ll be able to add clothes and props to your 3D characters with ease.
5. Exporting your character
When you’re happy with your character model, it’s time to export it for use in games or other applications. In Blender, go to File > Export > Wavefront (.obj), and then select the options you want for your export. Make sure to include normals and UVs, as these will be necessary for most applications.
If you’re looking to create 3D characters for use in games or animation, there are a few things you need to know about exporting your models from your 3D modeling software. First, it’s important to make sure that your model is in the correct file format. The most common format for game assets is .FBX, so we recommend exporting your character as an .FBX file. Additionally, you’ll need to make sure that your model is properly UV unwrapped. This will ensure that your textures are applied correctly when imported into Unity or another game engine. Finally, be sure to save your character model in a separate folder from your other assets. This will help keep your project organized and make it easier to find your files later on. By following these simple tips, you’ll be well on your way to creating professional-quality 3D characters for use in games and animation.
6. Tips for quality 3D models
Here are a few tips to help you create high-quality 3D character models:
– Use a reference image: It can be helpful to have one or more images of the character you want to create so that you can use them as a reference while you work.
– Pay attention to proportions: When modeling the head and body, pay attention to the proportions of the face and body, respectively. If the proportions are off, your character will look unnatural.
– Add subdivision levels: Be sure to add subdivision levels to your meshes so that they have enough detail when viewed up close.
– Export with normals and UVs: When exporting your character model, be sure to include normals and UVs, as these will be necessary for most applications.
Conclusion
Creating high-quality 3D character models can be a challenging task, but with the right tips and tricks, it is definitely doable. In this article, we have provided some tips for modeling the human body in 3D, adding clothes and props to your character, and exporting your model for use in games or other applications. With these tips in mind, you’ll be able to create beautiful and realistic 3D character models that look great no matter where they are used.